Build Passive Income This Week: A Three Tier 90 Day Plan for Beginners
Start with digital products or a high-yield savings account. Both let you begin this week with little to no capital, but neither pays out overnight. Digital products can bring a first sale within weeks; savings and dividend income build gradually over months. Skip anything that requires debt or promises fast, guaranteed returns.
TL;DR:
- Beginners should focus on low-cost, low-risk options like high-yield savings accounts or digital products that can generate income within weeks to a few months.
- Building sustainable passive income often requires ongoing maintenance, with digital products needing updates and rental assets demanding communication or repairs.
- Targeting the right tier—either time-based or capital-based—depends on current savings, available time, skills, and risk tolerance, not on aspirational income levels.
- Expect most passive streams to take several months to show meaningful results, emphasizing patience, consistent effort, and reinvestment.
- Avoid using debt, guarantees, or recruitment-based schemes, and always verify income claims with official sources to prevent scams and unnecessary risks.
Table of Contents
- What Does Passive Income for Beginners Actually Mean?
- The Best Passive Income Ideas for Beginners, Ranked by Cost and Timeline
- How Do You Pick Your First Passive Income Stream?
- What Does a Realistic 90-Day Plan Look Like?
- What Mistakes and Risks Should Beginners Watch For?
- Templates and Tools That Cut Your Setup Time
- Why Patience Beats Hustle in Passive Income
- Get the 90-Day Plan Built Out for You
- Sources
- FAQ
What Does Passive Income for Beginners Actually Mean?
Passive income for beginners means building a stream of money that keeps paying after the initial setup work is done, not money that arrives with zero effort ever again. That distinction trips up almost everyone starting out. Practitioner guidance from Experian points out that most beginners underestimate the ongoing maintenance a passive-income project requires, whether that’s updating a digital product, answering customer questions, or checking on a rental property. Treat your first stream like a small business with occasional upkeep, not a slot machine.
Most reputable guides, including explainers from New York Life, group passive income into three broad categories: investments, digital or creative products, and rentals. Where those guides fall short is telling you which one fits your actual starting point. That’s where a tier system helps more than a long list of ideas.
Tier 1: No capital, just time. You trade hours for setup instead of dollars. Think digital templates, an affiliate blog, a print-on-demand shop, or renting out a spare room or parking spot you already own. Startup cost is close to $0, but you’ll spend real hours writing, designing, or listing.
Tier 2: Small capital, low risk. You have a few hundred to a few thousand dollars and want safety while you learn. A high-yield savings account (HYSA), a certificate of deposit (CD), or a starter position in a dividend ETF belongs here. Risk is low, and so is the ceiling, at least at first.
Tier 3: Invest and scale. You have more capital, more risk tolerance, or an existing income stream you want to compound. REITs, larger ETF and bond fund positions, and reinvested dividends live here. This tier rewards patience over years, not weeks.
Here’s how the tiers map to common starting points:
- Tier 1 (time, no money): Digital products, affiliate content, print-on-demand, renting idle assets you own.
- Tier 2 (a few hundred to a few thousand dollars): HYSA, CDs, starter dividend ETF shares, fractional REIT investing.
- Tier 3 ($5,000 and up, or reinvested profits): Larger ETF/bond portfolios, direct rental property, diversified dividend portfolios.
Pick the tier that matches your current bank balance, not the one that sounds most impressive. You can always move up a tier once your first stream proves itself.
The Best Passive Income Ideas for Beginners, Ranked by Cost and Timeline
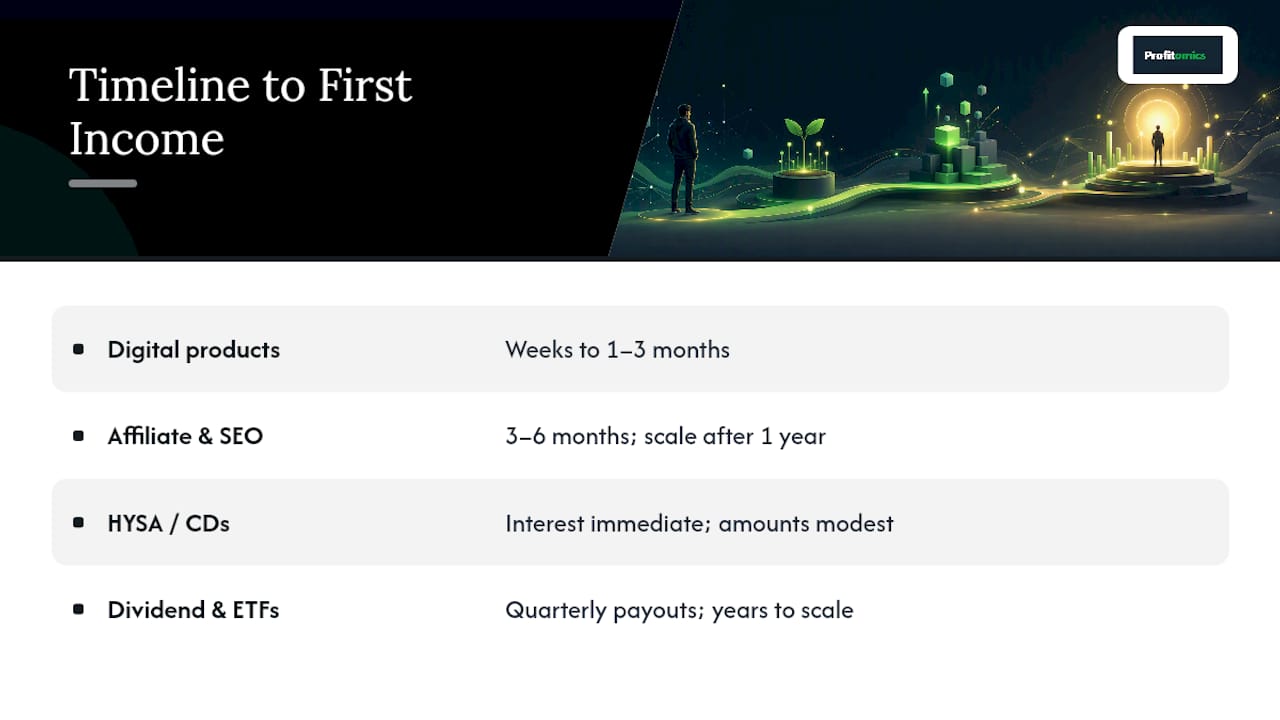
Every idea below gets evaluated the same way: what it costs to start, how long until you see real money, and who it actually suits. None of these are instant. Content-based income like blogs, affiliate sites, and courses commonly needs 3 to 12 months to produce meaningful returns for a beginner, and investing returns compound over years, not weeks.
Digital products (templates, e-books, mini-courses)
Cost to start: $0 to $200, mostly for design software or a simple sales platform. Timeline: your first sale can land in weeks if you already have an audience; without one, plan on one to three months to build enough traffic or outreach to convert. Best for people with a specific skill or piece of knowledge they can package once and sell repeatedly, from a résumé template to a niche how-to guide. Maintenance is real but light: occasional updates, customer emails, and refreshing your sales copy every few months.
Affiliate content and evergreen SEO
Cost to start: $0 to $150 for hosting and a domain if you build a blog; $0 if you use an existing social platform. Timeline: expect your first meaningful commission around three to six months in, with more substantial monthly totals showing up after a year of consistent publishing, according to beginner timeline data from Cents Forward. Best for people willing to write consistently for months before seeing real traffic. This is genuinely one of the slowest starts on this list, and also one of the most scalable once it compounds. Guidance for creators on growing a content-based business stresses picking one platform and one topic before spreading thin across five.
High-yield savings accounts and CDs
Cost to start: whatever you can deposit, even $25. Timeline: interest starts accruing immediately, though the amounts are modest until your balance grows. Best for beginners who want a safe place to park an emergency fund while they figure out their next move. The FDIC insures bank deposits up to the standard coverage limit per depositor, per bank, which makes an HYSA about as close to risk-free as personal finance gets. This isn’t a wealth-building engine on its own, but it’s the right first stop before you touch anything less liquid. A practical breakdown of emergency fund basics is worth a read before you decide how much to keep liquid versus invested.
Dividend and index ETFs, bond funds
Cost to start: $50 to $500 to open a brokerage account and buy your first shares; many brokers now allow fractional shares, so you can start smaller. Timeline: dividends typically pay quarterly, so your first payout could arrive within three months, but building noticeable monthly income takes years of consistent investing and reinvestment. The math here is worth knowing upfront: reaching $1,000 a month from dividends alone at a 4% yield requires roughly $300,000 in invested capital. That’s why most beginners blend dividend investing with a faster-moving stream like digital products rather than relying on it alone. Reinvesting dividends instead of cashing them out accelerates the compounding, and Investor lets you model exactly how long that takes at different contribution levels. If you’re deciding between individual stocks and funds, a beginner ETF guide walks through the basics of building a diversified starter position.
REITs and fractional real estate
Cost to start: $10 to $1,000 depending on the platform, since fractional real estate investment trusts let you buy a small slice of a property portfolio instead of a whole building. Timeline: distributions often arrive quarterly, similar to dividend ETFs, with real growth showing up over several years. Best for people who like the idea of real estate income without the maintenance calls, tenant screening, or six-figure down payment. The tradeoff against owning a rental directly is control: you don’t pick the properties, and you can’t force a rent increase. But you also don’t fix a broken water heater at 11 p.m.
Asset rentals and micro-rentals
Cost to start: $0, since you’re renting things you already own, like a spare room, a driveway parking spot, or tools sitting in a garage. Timeline: this is the fastest stream on the list. A listing can generate its first booking within days. Best for beginners in areas with rental demand who want cash flow now rather than compounding later. Check local zoning and short-term rental rules before listing. Cities and homeowner associations regulate this more than people expect, and a fine wipes out months of profit fast.
Print-on-demand and creator royalties
Cost to start: $0 to $100 for design tools, since most print-on-demand platforms handle production and shipping for a cut of each sale. Timeline: first sale can happen within weeks of launching a listing, but a steady monthly income usually takes several months of adding new designs and building an audience. Best for people with design or illustration skills who don’t want to hold inventory. The catch nobody advertises: royalty rates on these platforms are thin, often a few dollars per item, so volume matters more than any single hit design.
How Do You Pick Your First Passive Income Stream?
Match the stream to what you actually have right now, not what looks best on someone else’s income report. Run through this before committing to anything:
- Audit your capital. If you have less than a month’s expenses saved, put new money into an HYSA before anything else. Ramsey Solutions is blunt about this: never take on debt to chase passive income, and never invest money you can’t afford to lose or lock up.
- Audit your time. Ten hours a week points you toward Tier 1 options like digital products or affiliate content. Two hours a week points you toward Tier 2, where the setup is quick and the maintenance is minimal.
- Audit your skills. A skill you can teach or document (spreadsheets, design, a trade, a hobby you’re genuinely good at) converts directly into a digital product. No obvious skill yet? Start with investing streams while you figure that out.
- Audit your risk tolerance. If watching an account balance dip for a week keeps you up at night, start in Tier 2 with HYSA and CDs before touching ETFs or REITs.
- Pick exactly one stream. Not two, not three. Splitting your first 90 days across multiple ideas usually means none of them get enough attention to prove out.
Once you’ve picked a stream, follow a simple decision flow: test small, measure at 30 and 90 days, then scale or diversify based on what the numbers actually show. If your digital product hasn’t sold after a genuine 30-day marketing push, that’s data, not failure. Adjust the offer or the audience before assuming the whole idea was wrong.
Watch for red flags that show up in every “beginner passive income” corner of the internet. Any opportunity that requires you to take out a loan or use a credit card to get started is not a beginner-safe stream. Guarantees of a specific high return with no risk are a warning sign, not a selling point. So is anything structured around recruiting other people rather than selling a real product or service. The SEC publishes a list of questions worth asking before you put money into any investment offer, and running a suspicious opportunity through that list takes ten minutes and can save you thousands.
Pro Tip: Before building a full digital product, spend 30 days publishing two or three pieces of content around the topic or offer you’re considering. If nobody engages, saves, or asks questions, that’s a cheap, fast signal to adjust before you sink real hours into the finished product.
What Does a Realistic 90-Day Plan Look Like?
A 90-day plan works because it forces you to measure progress instead of just hoping it shows up. Pick the track that matches your capital: Variant A if you’re starting with $0, Variant B if you have a few hundred to a few thousand dollars to invest.
Variant A: $0 starter, digital product plus content
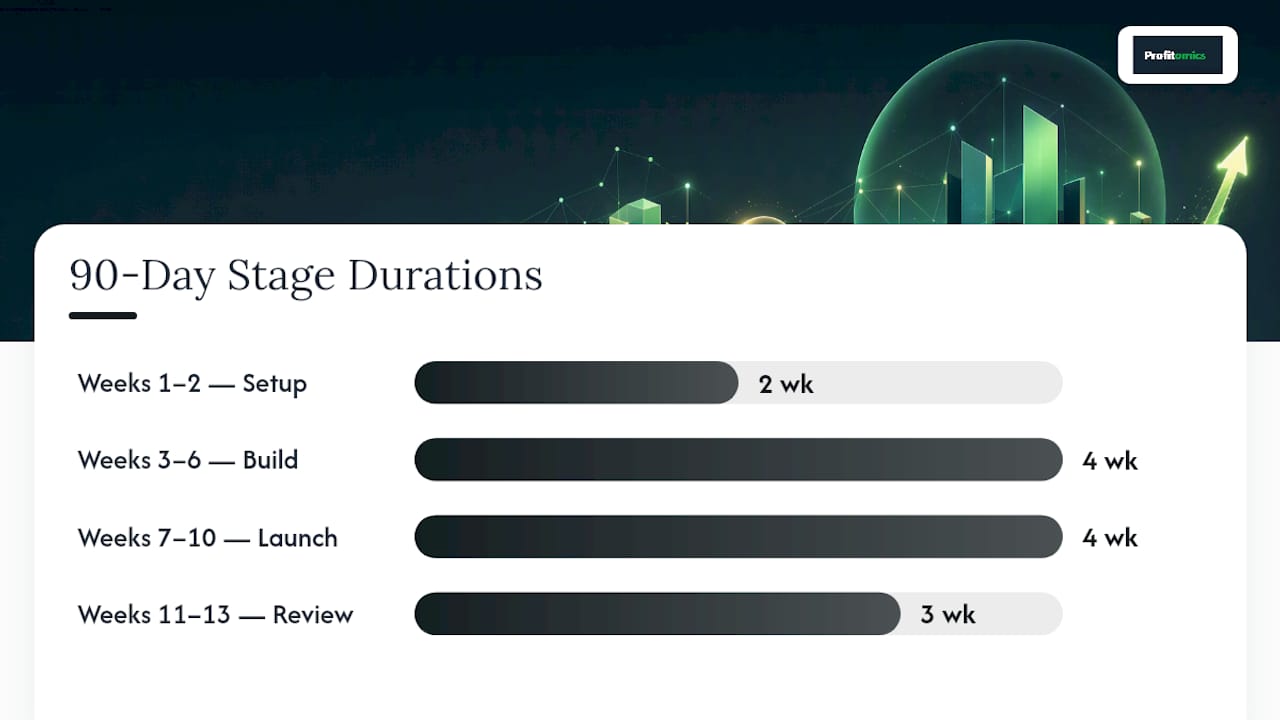
- Weeks 1 to 2: Pick one skill or topic, validate demand with a small content test (two to three posts, a poll, or direct outreach to 10 people), and outline your product.
- Weeks 3 to 6: Build the minimum viable version, whether that’s a template, a short guide, or a basic course outline, and set up a simple way to sell it.
- Weeks 7 to 10: Launch publicly, start consistent content publishing tied to the product’s topic, and collect feedback from your first buyers.
- Weeks 11 to 13: Review what sold and what didn’t, refine pricing or the offer itself, and decide whether to double down on this stream or add a second one.
Variant B: Small-capital investor track
- Weeks 1 to 2: Open a brokerage account if you don’t have one already, and move emergency savings into an HYSA if it isn’t already earning interest. A step-by-step beginner investing guide is worth reading before your first trade.
- Weeks 3 to 6: Research and buy your first dividend ETF or fractional REIT position, keeping the amount small enough that a market dip doesn’t rattle you.
- Weeks 7 to 10: Set up automatic monthly contributions and enable dividend reinvestment so growth compounds without manual effort.
- Weeks 11 to 13: Check your first quarterly dividend or distribution, use a compound interest calculator to project a one and five year outlook, and decide whether to add a second position or a Tier 1 stream alongside it.
Track concrete milestones, not vague progress: your first sale, your first dividend deposit, or a specific traffic number on your content. If 90 days pass with genuinely no signal, that’s your cue to pivot the offer or the platform, not necessarily the entire idea. If the signal is positive, scale by reinvesting profits into more inventory, more content, or a bigger position, rather than immediately jumping to a fourth income stream you haven’t tested yet.
What Mistakes and Risks Should Beginners Watch For?
The single biggest mistake beginners make is funding a new income stream with borrowed money. Debt turns a slow, low-risk plan into a high-pressure gamble, and financial educators are consistent on this point: never go into debt to chase passive income, no matter how confident the pitch sounds.
The second mistake is treating “passive” as “hands-off forever.” Digital products need occasional updates. Rental listings need upkeep and guest communication. Dividend portfolios need periodic rebalancing. Skipping maintenance is how a promising stream quietly dies within a year.
Watch for these scam patterns specifically:
- Pressure to pay quickly or “lock in” a rate before a deadline that resets every time you check back.
- Earnings claims you can’t independently verify, especially screenshots with no context or third-party proof.
- Compensation structured around recruiting new members rather than selling an actual product to real customers.
- Any promise of guaranteed returns on an investment, since no legitimate investment offers guarantees.
On taxes, keep it simple but don’t ignore it. Royalty and rental income both have specific reporting rules, and the IRS covers passive activity and at-risk rules in detail, including recordkeeping requirements you’ll want to follow from day one rather than reconstructing later. Dividend income gets reported too, typically via a 1099-DIV from your broker. Keep a simple spreadsheet from the start logging what you earned and what you spent on setup. Once your income grows past a hobby level, a conversation with a tax professional usually pays for itself.
Templates and Tools That Cut Your Setup Time
The 90-day plan above works faster with the right templates in hand instead of building every document from scratch. A launch checklist keeps the validation-to-launch sequence in order so you don’t skip steps under time pressure. A pricing calculator takes the guesswork out of setting a fair price for a digital product based on your costs and target margin. An income-tracking spreadsheet logs sales, dividends, and expenses in one place, which also makes tax time far less painful given the IRS recordkeeping expectations mentioned earlier.
Profitomics built The Passive Income Blueprint around this exact tier and 90-day structure: it walks through Tier 1 digital product setup, Tier 2 savings and dividend allocation, and Tier 3 scaling decisions, with the templates and checklists built in rather than left for you to assemble. The goal is shortening the gap between “I understand the plan” and “I actually launched something,” which is where most beginners stall out.
None of this replaces doing the work. A template speeds up formatting a pricing sheet; it doesn’t write your product or pick your niche for you. Treat these tools as scaffolding for the plan you already committed to in the sections above, not a substitute for the 90 days of actual effort.
Why Patience Beats Hustle in Passive Income
The gap between what passive income promises and what it delivers early on comes down to one thing: people expect a return on effort within weeks that realistically takes months. Building a passive stream is closer to planting an orchard than flipping a switch. The first season looks like almost nothing happened. Treat your first project like a small business, not a lottery ticket, and the odds tilt in your favor.
Two habits separate people who stick with it from people who quit at week six. First, time-block your passive income work the same way you’d block a work meeting, even if it’s just three hours a week. Sporadic effort produces sporadic results. Second, reinvest your first returns instead of spending them. The first $50 in dividends or the first $200 from a digital product sale grows faster back into the system than it does spent on something unrelated.
— Kai
Get the 90-Day Plan Built Out for You
Everything in this article works without buying anything: you can build a spreadsheet, write your own checklist, and track dividends by hand. But if you’d rather skip the setup and start executing this week, The Passive Income Blueprint packages the exact tier framework and 90-day plan above into ready-to-use templates, including a pricing calculator, launch checklist, and income tracker, so you spend your first weekend building your stream instead of building spreadsheets.
It’s built for the person starting from Tier 1 or Tier 2, not someone already managing a six-figure portfolio. If your first stream is going to be a dividend ETF or REIT position instead, Stock Market Mastery covers the longer-term compounding side in more depth. Either way, the templates only supplement the execution. You still have to publish, launch, and follow through on the plan. Browse the full Profitomics library to find the guide that matches the stream you picked, and get started this week rather than next month.
Sources
Before you report your first dollar of passive income or hand money to an investment platform, check it against an official source rather than a blog post. The IRS Publication 925 covers how rental income, royalties, and passive activities get reported, along with recordkeeping rules worth following from your first sale. The SEC’s investor questions guide gives you a script for vetting any advisor or investment offer before committing money. The FDIC’s deposit insurance resources confirm whether your bank and account type are actually covered before you park savings there. And Investor.gov’s compound interest calculator lets you model realistic dividend or interest growth instead of guessing.
- IRS Publication 925: Passive Activity and At-Risk Rules
- SEC: Questions investors should ask
- FDIC: Deposit insurance and resources
- Investor
FAQ
How can I make $1,000 a month in passive income?
Realistically, blend streams: a digital product or affiliate income covers part of it while HYSA interest or dividends cover the rest, since reaching $1,000 a month from dividends alone typically requires a large invested balance. Most beginners get there over one to three years, not overnight.
What’s the best passive income idea for beginners?
Digital products and high-yield savings accounts are the two most accessible starting points because both have low startup costs and let you begin this week. Which one fits better depends on whether you have more time or more capital available right now.
How do I passively earn $500 a month?
Combine a Tier 1 stream like a digital product or affiliate content with a Tier 2 stream like a dividend ETF, since relying on investment income alone for $500 a month requires a substantial invested balance. Expect the content side to take three to six months to gain traction.
How do I earn $4,000 a month in passive income?
At that level, most people are running multiple streams at once, often a scaled digital product business or rental income alongside a sizable investment portfolio, built up over several years rather than a single 90-day sprint. Treat it as a long-term target you scale toward, not a starting goal.
Is passive income really passive?
Not entirely. Most passive income requires real upfront work and ongoing maintenance, whether that’s updating a product, managing a rental listing, or rebalancing an investment portfolio, so treat your first stream like a small business rather than a set-it-and-forget-it system.